Forget Stores! Build a PRO-GRADE Ping Pong Table in Your Home with This SECRET Method
( If you purchase through our sponsored links, we may receive a small commission at no extra cost to you )
Buying a decent table can be a pricey backhand. That’s where the magic of DIY comes in, and here’s your guide to crafting your plywood ping pong paradise!
Before the rally begins, let’s gather our arsenal. You’ll need two sheets of high-quality plywood, at least 3⁄4-inch thick, sized 9×5 feet each (a good choice is Baltic birch for excellent playing characteristics), four 2x4s each 9 feet long for the table’s legs, wood glue, screws (appropriate for wood and plywood thickness), clamps, a circular saw or jigsaw for shaping the plywood and lumber, a sander for a smooth surface, and paint or sealant to protect your masterpiece.
Finally, don’t forget the game on essentials: a table tennis net and net posts, readily available at sports stores. With these trusty tools and materials, you’ll be well on your way to crafting a budget-friendly ping-pong haven that’ll have you and your loved ones volleying victories in no time!

| tep | Description | Additional Notes |
|---|---|---|
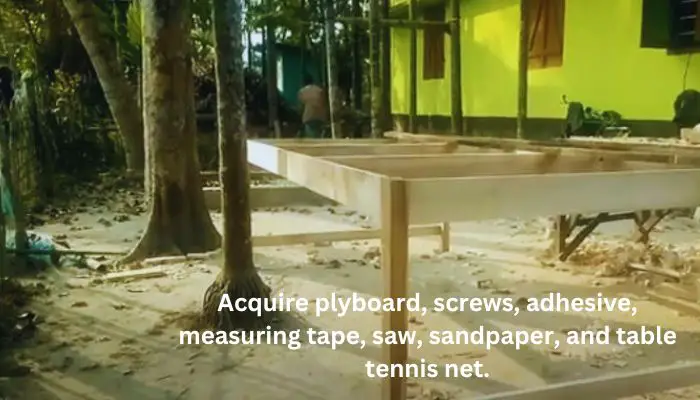
| 1 | Gather Materials: | Acquire plyboard, screws, adhesive, measuring tape, saw, sandpaper, and table tennis net. |
| 2 | Measurements: | Determine the desired size for your table (standard size is 9ft x 5ft) and mark on the plyboard. |
| 3 | Cut Plyboard: | Use a saw to cut the plyboard along the marked lines, creating the tabletop. |
| 4 | Prepare Legs: | Cut four pieces of plyboard for the legs. Standard table height is 30 inches; adjust accordingly. |
| 5 | Attach Legs: | Affix the legs to the tabletop corners securely using screws. Ensure stability and equal height. |
| 6 | Surface Smoothing: | Sand the tabletop and legs to create a smooth playing surface and prevent splinters. |
| 7 | Paint or Seal: | Apply a suitable finish to protect the wood from moisture and enhance the playing experience. |
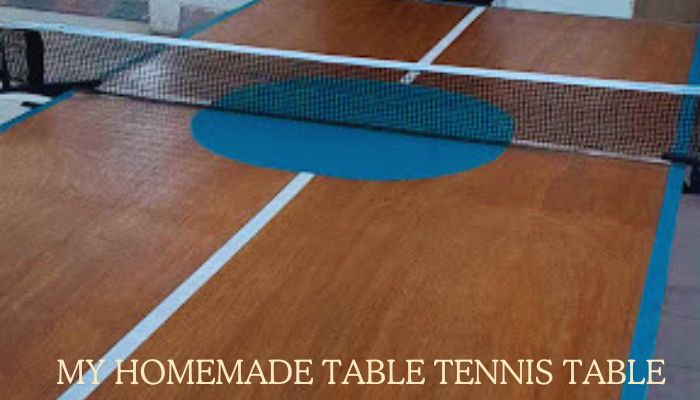
| 8 | Add Boundary Lines: | Use masking tape or paint to mark the table’s boundary lines and center line. |
| 9 | Attach Net: | Secure the table tennis net to the marked points on both ends of the table. |
| 10 | Quality Check: | Ensure the table is level, stable, and meets standard dimensions. Make adjustments as needed. |
Read Also: What Type of Table Top is Good for Making Table Tennis Table: Ultimate Guide
Materials and Tools Needed to Make Table Tennis Table
Before the rally begins, let’s gather our arsenal. You’ll need:
- Plywood Sheets: Two sheets of high-quality plywood, at least 3/4-inch thick, sized 9×5 feet each. Baltic birch offers excellent playing characteristics, but choose what suits your budget and availability.
- Lumber for the Frame: Four 2x4s, each 9 feet long, for the table’s legs. Additional 2x4s can be used for cross-bracing for extra stability.
- Hardware: Wood glue, screws (appropriate for wood and plywood thickness), clamps.
- Cutting Tools: A circular saw or jigsaw for shaping the plywood and lumber.
- Finishing Tools: A sander for a smooth surface, and paint or sealant to protect your masterpiece.
- Game on Essentials: A table tennis net and net posts, readily available at sports stores.
Building the Tabletop
Now, let’s sculpt our playing surface. Lay the plywood sheets flat and, using your cutting tool of choice, follow the table tennis standard dimensions: 9 feet long, 5 feet wide. Remember, accuracy is key for consistent bounce!
Once cut, use wood glue and clamps to carefully join the two sheets along the long edge. Clamp it tight and leave it to dry overnight for a seamless playing surface.
Pro Tip: To ensure a perfectly level table, use a straightedge or laser level to check for any dips or bumps before clamping. Sand any minor imperfections for a true champion’s court.
Building the Frame
While the glue dries, let’s create the foundation. Cut the 2x4s into four 27-inch legs and eight 54-inch side supports. Arrange the legs in pairs, forming an “H” shape with a 54-inch gap at the bottom.
Secure them with wood glue and screws, creating a sturdy base for the tabletop. Repeat for the other pair of legs.
Now, join the leg pairs with the 54-inch side supports, forming a rectangular frame. Again, wood glue and screws are your trusty allies. For extra stability, add diagonal cross-braces using additional 2x4s cut to fit. Remember, a stable frame equals consistent rallies!
Attaching the Tabletop
Time to marry the base and the surface! Place the tabletop carefully onto the frame, ensuring it’s centered and aligned with the edges. Secure it using sturdy screws driven through the frame and into the plywood from below. Pre-drilling the holes can prevent splitting, and remember, even spacing is your friend for an optimal bounce.
Finishing Touches
No champion’s court is complete without a smooth touch. Grab your sander and buff away any rough edges or imperfections on the frame and tabletop. Aim for a buttery-smooth surface that’s a dream to rally on.
Finally, unleash your inner artist! Paint the frame in your team’s colors, add stripes or a logo to the playing surface – personalize your ping pong paradise!
Pro Tip: Don’t forget the protective coat! Apply a sealant or paint suitable for outdoor use if you plan to keep your table outside. This will shield it from weather and ensure its longevity.
Net Play: Setting Up for Action!
The moment you’ve been waiting for! Install the net posts by following the manufacturer’s instructions. Most net posts clamp onto the side of the table, keeping things simple and convenient. Stretch the net across the posts, tighten it to the desired tension, and voilà! Your DIY table tennis arena is ready for action.
Testing and Triumph
Before the grand slam, a test run is vital. Grab your paddle, gather your friends or family, and unleash your serves! Check for bounce consistency, levelness, and overall stability. Fine-tune any minor adjustments, and celebrate your creation!
Customization and Beyond
Remember, your DIY masterpiece is a blank canvas for your imagination. Want a foldable table for easy storage? Add hinges to the frame! Craving a storage compartment for paddles and balls? Build one into the base! The possibilities are endless. Share your unique creations and inspire others to join the DIY ping pong revolution!
Unleash the Light Show Scoreboard
Tabletop Fireworks
Beneath the net, a strip of LED lights awaits, ready to illuminate the score in a vibrant dance of color. Frosted plexiglass softens their glow, creating an ethereal display that blends seamlessly with the table’s surface.
Arduino Orchestrates the Action
The Arduino Uno, a mastermind of electronics, takes charge of the scoring symphony. With each tap of foot-friendly arcade buttons strategically placed at the table’s legs, it paints points in radiant red and blue hues, eliminating any need for mental scores or contested calls.
The table itself becomes a living scoreboard, announcing victories and defeats in a captivating light show that elevates every game.
Frequently Asked Questions about Building Your Own Plywood Ping Pong Table
Building your own ping pong table can be a rewarding experience, but it’s natural to have some questions along the way. Here are a few of the most common FAQs, along with some helpful answers:
1. What type of plywood is best for a ping pong table?
The best type of plywood for a ping pong table is one that is:
- High-Quality and Smooth: Choose a grade A or B plywood, which will be free of knots or voids that could affect the bounce of the ball.
- Durable: Look for plywood that is resistant to warping and moisture damage. Baltic birch is a popular choice for its strength and playing characteristics.
- The Right Thickness: Most table tennis tables use plywood that is 3/4 inches thick. This provides a good balance between bounce and stability.
2. Do I need to seal the plywood before painting it?
Yes, it is a good idea to seal the plywood before painting it. This will help to protect it from moisture damage and make the paint adhere better. Use a high-quality exterior-grade sealer for best results.
3. How can I make my table tennis table foldable?
There are a few different ways to make your table tennis table foldable. One option is to use hinges to attach the top to the frame. Another option is to use detachable legs. Whichever method you choose, make sure that the hinges or legs are strong enough to support the weight of the table.
4. Where can I find plans for building a ping pong table?
Many online resources offer plans for building a ping pong table. You can also find plans in some woodworking magazines. Once you have found a plan that you like, be sure to read it carefully and make sure that you have all of the necessary materials before you start.
These are just a few of the many questions that you may have about building your ping pong table. With a little planning and effort, you can create a table that is both functional and fun to play on. So grab your tools and get started!
Final Serve
Building your own plywood ping pong table is more than just a project; it’s a testament to your creativity, resourcefulness, and love for the game.
With these trusty tools and materials, you’ll be well on your way to crafting a budget-friendly ping-pong haven that’ll have you and your loved ones volleying victories in no time! But remember, the true reward of DIY lies beyond the final product.
It’s the satisfaction of breathing life into an idea, the thrill of overcoming challenges, and the joy of sharing your creation with others. So go forth, unleash your inner craftsman, and build a ping-pong paradise that reflects your unique spirit.
After all, the greatest rallies often begin with a single stroke of inspiration.


